
The Kitchen Refresh That Made My House Feel More Like Home

This post contains affiliate links. If you click and make a purchase, I may earn a small commission at no extra cost to you. I only recommend products I genuinely love and use.
Hi friend,
A few years ago, my husband and I bought our first house as fresh newlyweds. We had been looking for a bit because the market was crazy (per usual for our area), but the wait ended up being worth it. We were blessed to find a home that had just been flipped and was move-in ready with lots of solid updates. It basically gave us a blank slate to make it our own. Over the years, we have slowly chipped away at making it feel more like us and giving it the personality it deserves.
We’ve tackled small projects as time and money have allowed, and little by little it’s turned into a home that truly feels like ours. I say we, but I mean mostly my husband, ha! I come up with all the fun ideas and he gets to have more projects added to his plate. I promise I try to help as much as I can, I’m just not a handy person. He’s a great sport though, thankfully, and loves to keep busy. I have yet to come up with a project he can’t handle!
The Vision
Creating a Cozy, Timeless Kitchen
The kitchen is a huge focal point in our house and is where I spend a good portion of my day. It’s worked fine for me with the new appliances and updated finishes, but I have always felt like it lacked warmth. Between the stainless steel appliances, white cabinets, and black accents, it leaned more modern than my personal style. I needed something more cozy for a space that I spend so much time in. I didn’t want to spend thousands of dollars redoing a kitchen that had just been completely gutted and renovated though, so I decided a little refresh would be the perfect compromise.
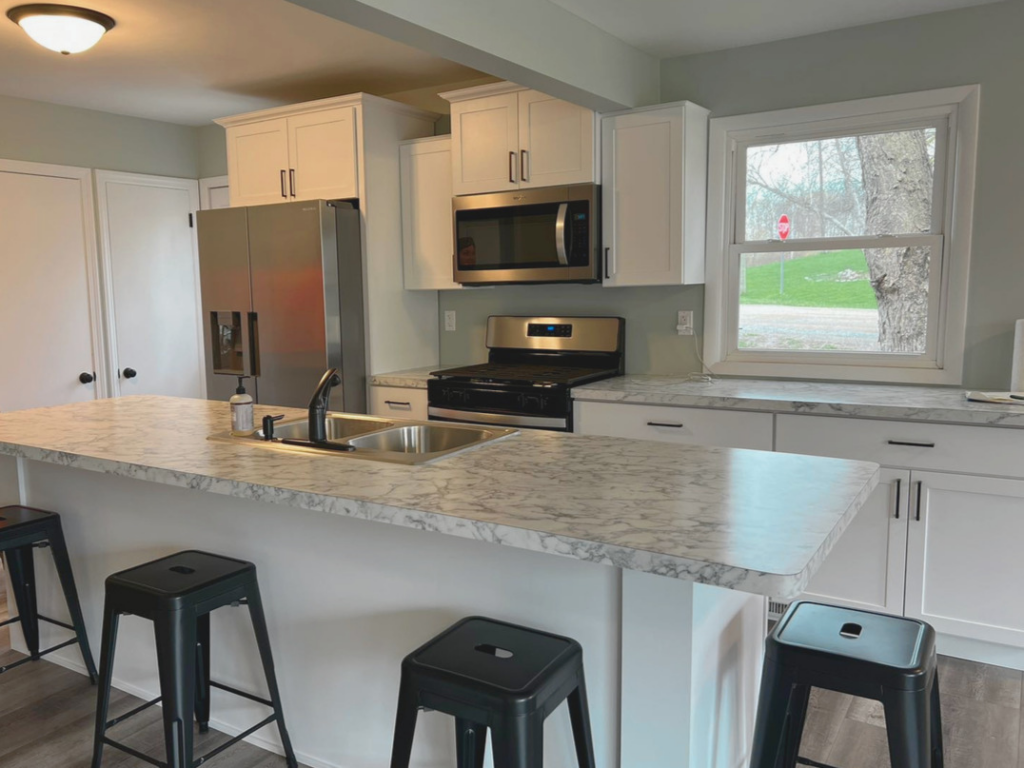
This project didn’t require a lot of time or elbow grease, and I ended up wishing that I had done it sooner! I am so in love with how it turned out and enjoy spending time in the kitchen so much more now. If you’re looking for inspiration for making your own kitchen have a more cozy, timeless, vintage look, then you’re in the right place! I spent lots of time searching for pieces that I adore, and you get to benefit from all that hard work.
Designing the Refresh
I made lots of little mock ups of the products in my kitchen to make sure that everything would work well together. I am the worst person at visualizing anything, like the actual worst. Don’t ask me if I think a piece of furniture will look good in your room. I need pictures of the exact space and product so I can stick them together using Instagram stories. Then, and only then, I can give you an answer.
Since I have an unfortunate lack of creative visualization, I utilize the heck out of mood boards for every home project. Seeing everything side by side before ordering gives me more confidence that it’ll all work together. The final inspo mood board for my kitchen:
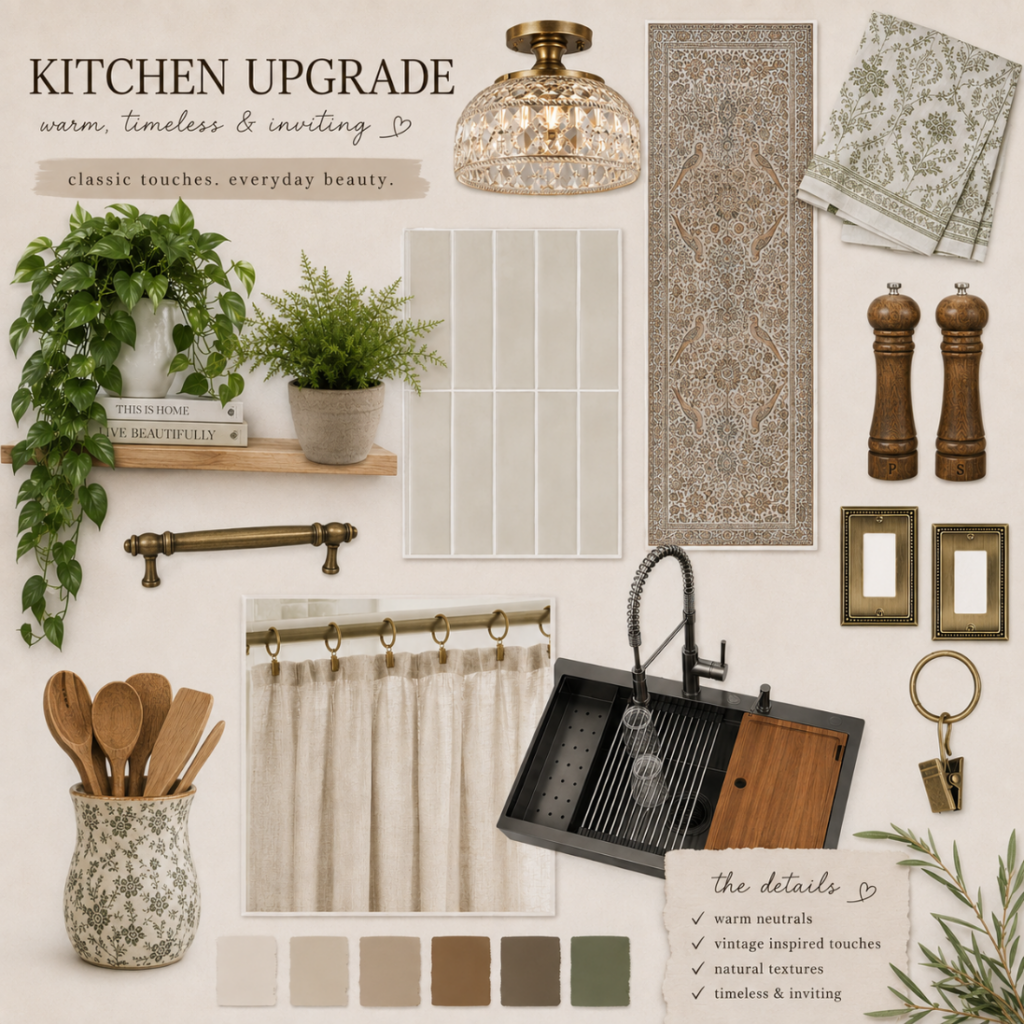
My main goal was to add some warmth to the space. I wanted to incorporate more wood and brass tones, as well as some greenery scattered throughout to lighten up the space and make it seem more “alive” (even if my greenery is fake because I can’t keep plants alive for the life of me). I didn’t have a strict budget because I knew this would become a look I’d enjoy for years. I hoped to keep the budget under $1,000, and the total came in around $1,200 – which I don’t think is too bad considering the sink setup alone accounted for nearly half of the budget. No regrets though, the work station sink and pull down sprayer faucet may be my favorite part of the whole refresh.
The Sink Upgrade
Choosing the Style of Sink
I ran across work station style sinks years ago on Instagram and fell in love with all of the features! The ease of being able to swap between all of the accessories is what really caught my attention. I swear I cut up enough fruit every day to feed an army (nope, just my fruit-obsessed toddler), so the strainer and cutting board are a huge plus. It also looks so much more chic to have the drying rack incorporated into the sink design instead of having rubber mats taking up valuable counter space.
Single Bowl vs. Double Bowl
The original sink was a double bowl and the switch to a single bowl makes it feel SO much bigger, even though the measurements didn’t change. I have to watch myself now because of how spacious it feels and really prioritize getting dishes clean or in the dishwasher asap so they don’t stack up. The sink had to be a top mount because I *cough* may or may not *cough* let the dishes pile up from time to time…and we definitely don’t need it falling through the countertop. I never claimed to be perfect.
The Glass Rinser Upgrade
I decided to add on a glass rinser instead of a built-in soap dispenser, and it elevates the feel of the sink so much! A few friends have asked whether I miss the built-in soap dispenser, but I honestly don’t mind reaching three extra inches for a cute soap bottle. I do really wish that we had the glass rinser when our daughter was a baby though because that would have been amazing to have for bottle washing.
Was It Worth It?
I didn’t go into this decision without any concerns, but thankfully nothing has been an issue so far. My first big concern was that the accessories would be a pain to store, but it hasn’t been an issue. It doesn’t take up that much space in our cabinet, and it wasn’t anything that a little reorganization couldn’t handle. My second big concern was that I would miss the double bowl when having to thaw food. It hasn’t been a big deal to take out a bowl and put it in the sink to act as a designated space for a cold water thaw. I don’t miss that double bowl at all! 10/10 would choose this style of sink again.
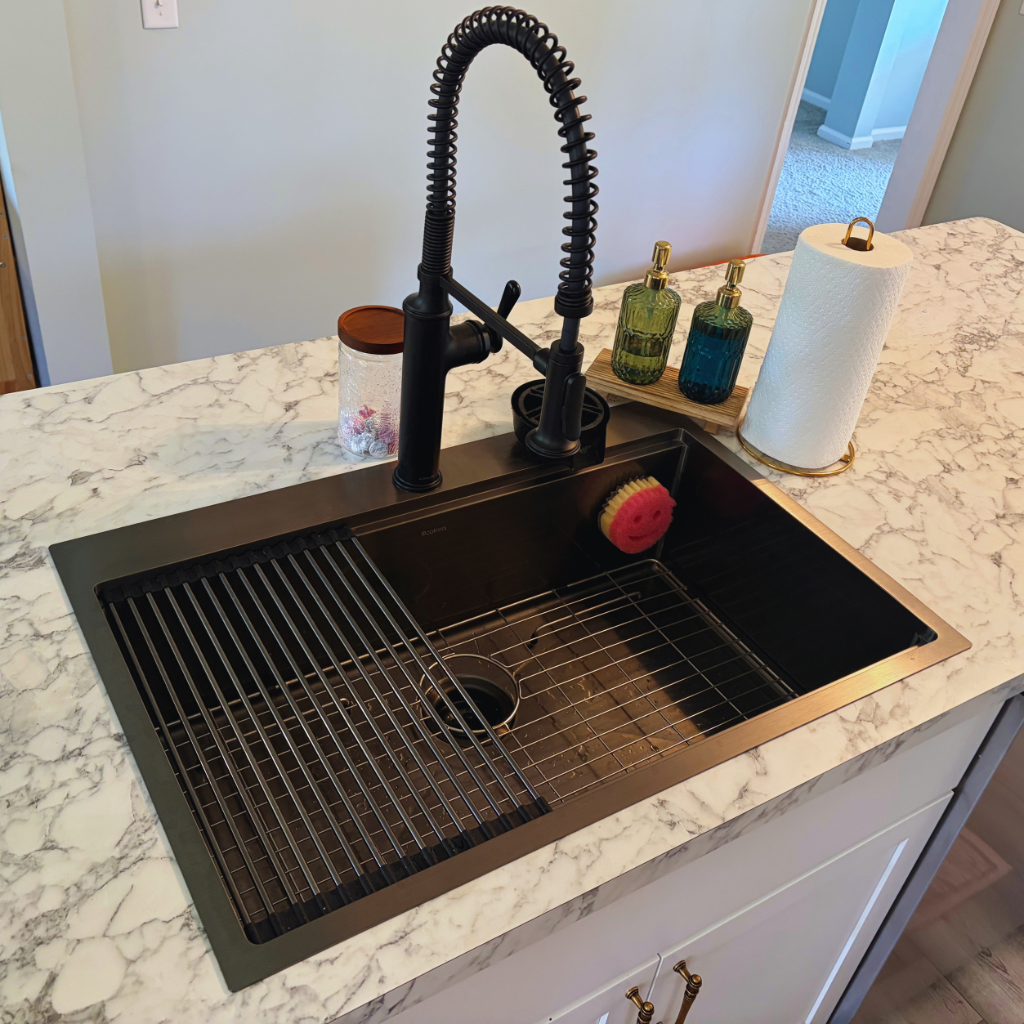
Here she is in all her glory
The drying rack is definitely my most used accessory. Even with it in place, you can still see how much sink space I have to work with! It easily rolls up to store away when I’m not using it.
Once the sink was finished, I turned my attention to another area that had bothered me since day one. It did require a power tool, but it wasn’t a huge project, and it ended up making one of the biggest differences in how the kitchen feels.
The Window Refresh
I have struggled for years with what to put on the kitchen window for some privacy, and since I couldn’t decide, we just lived without much privacy instead. Notice that nice road right outside the window? Ugh. I originally thought I wanted roman shades but wasn’t sure if they were the perfect fit. The window frame is an older style that is pretty shallow so I was put off on trying to get creative with a solution for it that looked good. Cue the cafe curtains! No funky mounting issues. Impeccably cute, cozy vibe. The perfect amount of privacy while still allowing me to see our trees outside the window. Chef’s kiss.
The ring clips are a cute way to hang the curtains up, and bonus that they double as a toddler toy. My daughter can be entertained for a good chunk of time sliding them back and forth. And back and forth. And back and forth again.
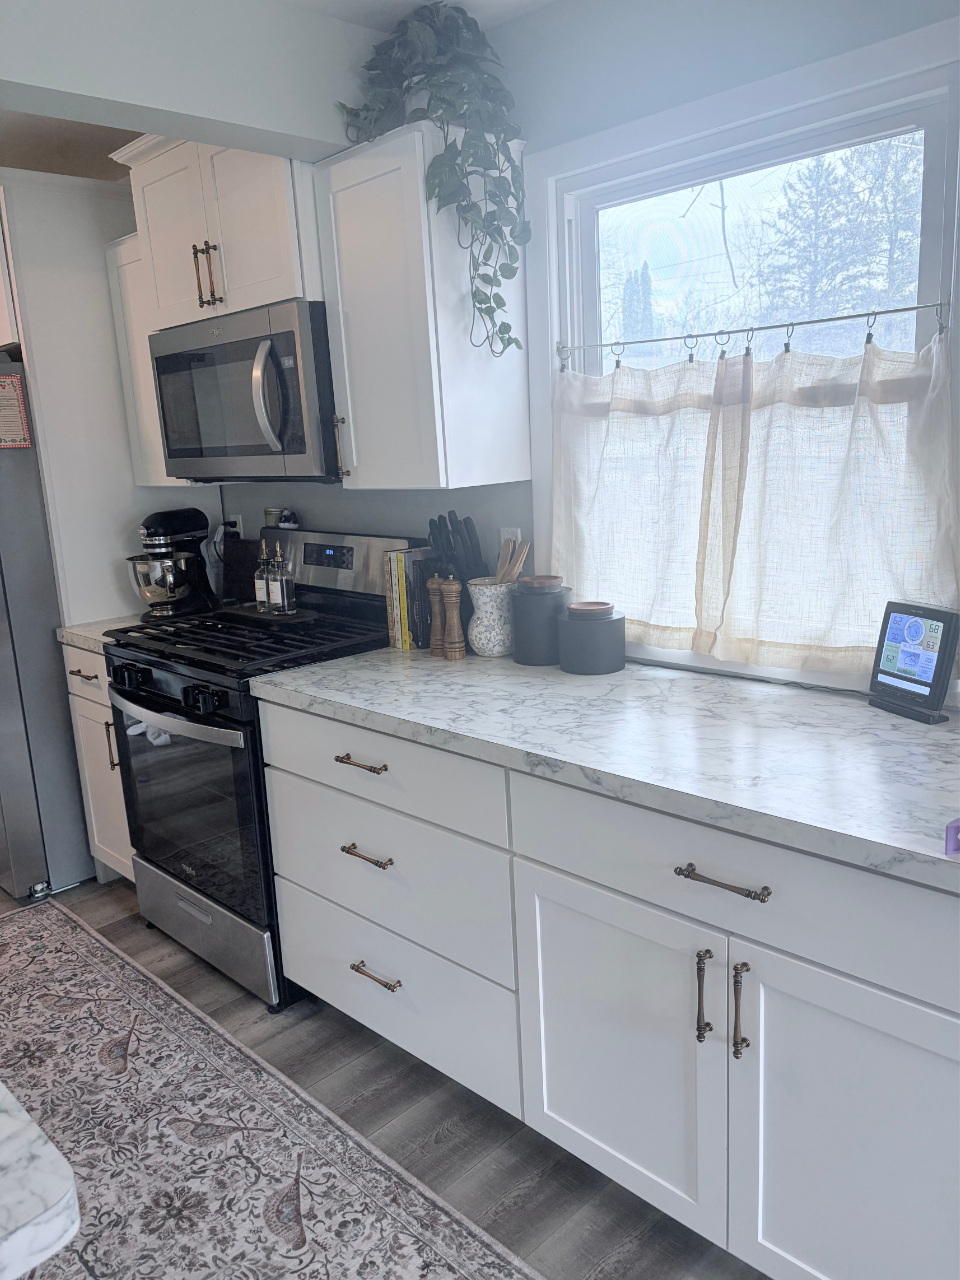
The curtains gave the room the cozy feeling I’d been missing, but they definitely weren’t the only piece that helped bring the vision together.
The Finishing Touches
Peel and Stick Backsplash
The backsplash was actually one of the few easy decisions that I made in regards to design. I wanted something that went with the cabinets, was more neutral toned, but added a little bit of warmth. The shade of our backsplash checked every box. It’s an easy peel and stick style and has stayed great so far! We (we as in my husband, lol) had a laser level to help line things up when putting the peel and stick squares up, and it didn’t take very long to do at all.
Unfortunately, the exact peel and stick backsplash that I used isn’t available anymore, but I will keep checking and add a link if it becomes available again!
Vintage-Inspired Lighting and Rug
The rug and light fixture are the stars of the show in regards to bringing some personality and vintage flare to the space. The first thing to arrive from all of my Amazon orders was actually the rug, and I couldn’t believe how much of a difference that one little adjustment made. It completely changed the feel of the room. The first light fixture arrived completely shattered, so be careful when opening the box if you order the same one. I had zero issues with getting a timely replacement that was in perfect condition thankfully.
Antique Brass Hardware
The cabinet pulls were kind of what set the whole vision for the kitchen rolling. I never loved my white cabinets, but I didn’t want to create a huge project with painting them. I had a hard time coming up with ideas until I ran across these antique brass pulls because I wasn’t sure how to get the vision that I wanted without completely changing the cabinets. These solved my problem! I swapped out my modern black ones and boom – a whole new vibe. Bonus that there aren’t sharp corners for little heads to bonk into anymore too.
The Little Details That Matter
The rest of the refresh was all about the finishing touches, and honestly, those little details can make or break a space.
The outlet covers aren’t front and center, but swapping the generic white outlet covers for brass ones somehow tied everything together.
The salt and pepper grinders were intended to go on the back of the oven to fill some blank space, but did I measure to make sure they would fit? Of course not. They were way too tall. They were too perfect to return though, so they found a home on the counter instead. I feel like a proper little chef whenever I use them for cooking instead of a shaker.
Even though I’m thrilled with how everything came together, I don’t think a home is ever truly “finished.” I still have a few more ideas floating around for this space, and I’m sure more will pop up as time goes on.
What’s Next
The only thing that’s left to find are some cute bar stools for around the island. The black metal stools are the last thing reminding me of the old kitchen. I have run across a couple styles that are potential winners, but then they seem to only come in a set of three and we need four. Hopefully soon I’ll find ones that will work! Overall, I am so happy with how this little face lift turned out. Over time, I’d like to add some more vintage items that I find while thrifting or on Facebook marketplace and add a little bit more grandmacore to the kitchen. I have a few decor ideas in mind, but haven’t found the perfect fit to make them happen yet.
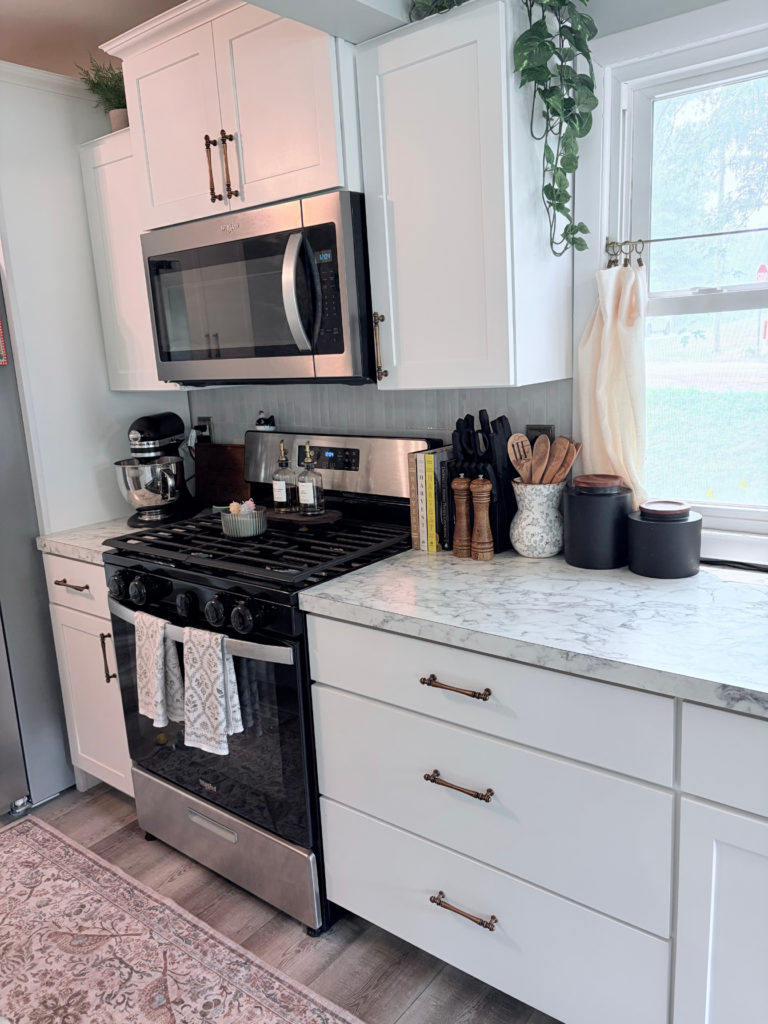
In reality, the aesthetic is less perfect. There’s baby proofing knobs on the oven, and the utensils in the crock are usually all out of sorts. The towels are hanging up maybe 30% of the time because one of my toddler’s favorite hobbies is pulling them down and tossing them across the room. I’m learning to embrace the chaos, but at least I get to spend it in a warm and welcoming space now!
Shop the Post
If you’re ready to give your own kitchen a little facelift and found some inspiration here, I’ve gathered all the links into one space to make it easy!